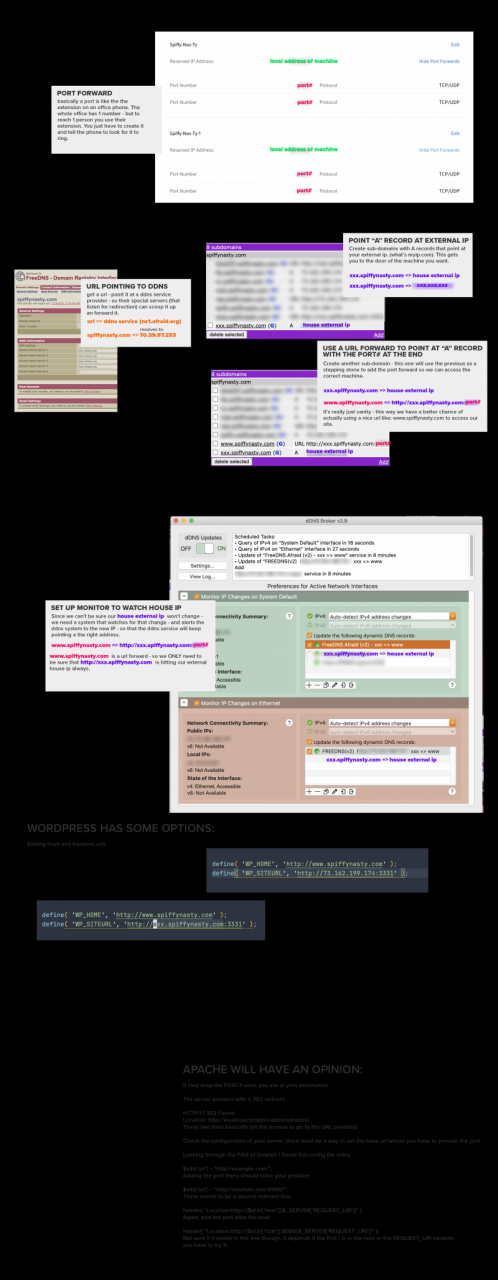


Port Forwarding
Spiffy-Nas-Ty-XXX
Reserved IP Address: XX.X.X.XXX
Port Forwards
Port Number XXXX ProtocolTCP/UDP
Spiffy-Nas-Ty-XXX
Reserved IP Address:XX.X.X.XXX
Port Forwards
Port Number XXXX ProtocolTCP/UDP
Port Number XXXX ProtocolTCP/UDP
Afraid – DDNS
Type: A – Point subdomain.domain.com to a hard coded IP Address. Most direct and straight forward option, also note any change you make in the FreeDNS program is reflected on the internet and made live immediately. The only way you will not see immediate results is if you have cached a query on your computer by looking it up PRIOR to configuring it in the FreeDNS program.
Type: MX – Point subdomain.domain.com to a mail server. These type of records are special for just mail servers, they can co-exist with A records, and their only use is for routing mail to a different location. All mail implementations check for this record first before attempting to route an e-mail message. If a MX record does not exist for a host, an e-mail delivery would be attempted directly to the IP that the hostname resolves to.
Type: AAAA – Point subdomain.domain.com to a IPv6 address. Useful for those who are using IPv6 on their personal networks or those who are using a IPv4 to IPv6 tunnel at home.
Type: CNAME – Point subdomain.domain.com to another hostname. Good for those who are using other dynamic DNS services. You can create a CNAME record to another host and whatever subdomain.domain.com you choose here will go to whatever IP address the CNAMEd host has.
Type: NS – Point subdomain.domain.com to another NAMESERVER. If you choose this option, then whatever subdomain.domain.com address you choose using FreeDNS will have to be configured and setup on the destination ADDRESS (nameserver) that you choose. This option basically means you are delegating a FreeDNS host to another DNS server all together, so when you choose this option you are telling every computer on the internet to ask the 'address' where subdomain.domain.com is located at. If the host you point an NS record to is not configured to answer for the subdomain.domain.com that you are using in FreeDNS then the subdomain.domain.com host will not resolve.
Type: TXT – Lets you create TXT records, used for a number of different things, most commonly for DKIM records (for combatting spam) so other receiving mail servers can verify email was sent from you by verifying your publically published crypto-signature. Wrap your TXT "destination" in quotes (don't worry, the system will remind you if you forget).
Type: SPF – A anti-spam record, good to have on any domain you're sending email with. See https://www.spfwizard.net/ for more details.
Type: LOC – A means for Expressing Location Information in the Domain Name System.
RFC1876 has the complete explanation.
To find your latitude/longitude location, you may find Map-O-Rama of use.
Type: RP – The Responsible Person RR.
RP has the following format:
RP
Both RDATA fields are required in all RP RRs.
The first field,
The second field,
RFC1183 has the complete explanation.
Type: SRV – A 'service' record, used by Session Initiation Protocol (SIP), and the Extensible Messaging and Presence Protocol (XMPP). Also used by Minecraft.
Some examples:
Type: SRV
Subdomain: service.protocol.subdomain
Destination: 4 fields, separated by a space (Priority Weight Port Target)
Some more random examples:
Type: SRV
Subdomain: minecraft.tcp.mc
Domain: yourdomain.com
Destination: 0 0 25676 dns.yourdomain.com
Type: SRV
Subdomain: jabber.tcp
Domain: yourdomain.com
Destination: 10 0 5269 jabber.yourdomain.com
Type: SRV
Subdomain: jabber.tcp
Domain: yourdomain.com
Destination: 20 0 5269 xmpp-server1.l.google.com
Subdomains

Web Forwards

Dynamic DNS

DNS BROKER
System Default

Ethernet

NAS SETTINGS


Note about enabling EZ-Connect port forward –
- Was giving me an erorr about UPnP on my modem (which was enabled but Zero Config was not)
- Xfinity Technicolor Model:TC8305C
- http://10.0.0.1 to access the modem – login
- ADVANCED Menu > Device Discovery > Enable UPnP: Enable, Advertisement Period: 30, Time to Live: 5, Enable Zero Config: Enable
- then I had the device try to connect again – which it did
- so I disabled zero config
- device continues to be connected


NEW:::
<IfModule mod_rewrite.c>
RewriteEngine On
RewriteRule .* – [E=HTTP_AUTHORIZATION:%{HTTP:Authorization}]
RewriteBase /
RewriteRule ^index.php$ – [L]
RewriteCond %{REQUEST_FILENAME} !-f
RewriteCond %{REQUEST_FILENAME} !-d
RewriteRule . /index.php [L]
OLD::::
# BEGIN WordPress
# The directives (lines) between "BEGIN WordPress" and "END WordPress" are
# dynamically generated, and should only be modified via WordPress filters.
# Any changes to the directives between these markers will be overwritten.
<IfModule mod_rewrite.c>
RewriteEngine On
RewriteRule .* – [E=HTTP_AUTHORIZATION:%{HTTP:Authorization}]
RewriteBase /
RewriteRule ^index.php$ – [L]
RewriteCond %{REQUEST_FILENAME} !-f
RewriteCond %{REQUEST_FILENAME} !-d
RewriteRule . /index.php [L]
# END WordPress
also removed cacheing:
<IfModule mod_expires.c>
ExpiresActive On
# Images
ExpiresByType image/jpeg "access plus 1 year"
ExpiresByType image/gif "access plus 1 year"
ExpiresByType image/png "access plus 1 year"
ExpiresByType image/webp "access plus 1 year"
ExpiresByType image/svg+xml "access plus 1 year"
ExpiresByType image/x-icon "access plus 1 year"
# Video
ExpiresByType video/webm "access plus 1 year"
ExpiresByType video/mp4 "access plus 1 year"
ExpiresByType video/mpeg "access plus 1 year"
# Fonts
ExpiresByType font/ttf "access plus 1 year"
ExpiresByType font/otf "access plus 1 year"
ExpiresByType font/woff "access plus 1 year"
ExpiresByType font/woff2 "access plus 1 year"
ExpiresByType application/font-woff "access plus 1 year"
# CSS, JavaScript
ExpiresByType text/css "access plus 1 month"
ExpiresByType text/javascript "access plus 1 month"
ExpiresByType application/javascript "access plus 1 month"
# Others
ExpiresByType application/pdf "access plus 1 month"
ExpiresByType image/vnd.microsoft.icon "access plus 1 year"
MySQL Database User: Which Privileges are needed?
The short installation instruction for WordPress ("5 Minutes") state that:
Create a database for WordPress on your web server, as well as a MySQL user who has all privileges for accessing and modifying it.
While setting up a new blog professionally I was wondering how that maps to what the MySQL database user privileges/permissions configuration offers me:
-
Data:
SELECT,INSERT,UPDATE,DELETE -
Definition:
CREATE,ALTER,DROP -
Extra:
INDEX -
More:
LOCK TABLESREFERENCESCREATE TEMPORARY TABLESCREATE VIEWSHOW VIEWCREATE ROUTINEEXECUTEALTER ROUTINE
I'm pretty sure for the first three groups, I named them Data, Definition and Extra here. But what about the others below the More entry? Normally I would say, those are not needed, but I would like to get a second opinion.
ANSWER:
The others are not needed as you point out.
Btw, what you could do is, conditionally set the user/pass based on the requested page. As in unprivileged with select/insert/update/delete for normal usage, and privileged with definition/index related stuff in addition when visiting the upgrade page.
The official documentation says to give the user all privs. Others suggest that you can restrict it to
- INSERT
- UPDATE
- DELETE
- CREATE
- DROP
- ALTER
- INDEX
Plugins etc can though call any statement they want so you would have to thoroughly test everything you install if you restrict privileges.
HOW TO CREATE DATABSE – USER / ADD PRIVILEDGES
utf8mb4_general_ci
Using phpMyAdmin #Using phpMyAdmin
If your web server has phpMyAdmin installed, you may follow these instructions to create your WordPress username and database. If you work on your own computer, on most Linux distributions you can install PhpMyAdmin automatically.
*Note: These instructions are written for phpMyAdmin 4.4; the phpMyAdmin user interface can vary slightly between versions.*
-
If a database relating to WordPress does not already exist in the
Database
dropdown on the left, create one:
- Choose a name for your WordPress database: ‘
wordpress‘ or ‘blog‘ are good, but most hosting services (especially shared hosting) will require a name beginning with your username and an underscore, so, even if you work on your own computer, we advise that you check your hosting service requirements so that you can follow them on your own server and be able to transfer your database without modification. Enter the chosen database name in the Create database field and choose the best collation for your language and encoding. In most cases it’s better to choose in the “utf8_” series and, if you don’t find your language, to choose “utf8mb4_general_ci” (Refer this article).

- Choose a name for your WordPress database: ‘
-
Click the
phpMyAdmin
icon in the upper left to return to the main page, then click the
Users
tab. If a user relating to WordPress does not already exist in the list of users, create one:


- Click Add user.
- Choose a username for WordPress (‘
wordpress‘ is good) and enter it in the User name field. (Be sure Use text field: is selected from the dropdown.) - Choose a secure password (ideally containing a combination of upper- and lower-case letters, numbers, and symbols), and enter it in the Password field. (Be sure Use text field: is selected from the dropdown.) Re-enter the password in the Re-typefield.
- Write down the username and password you chose.
- Leave all options under Global privileges at their defaults.
- Click Go.
- # Return to the Users screen and click the Edit privileges icon on the user you’ve just created for WordPress.
- # In the Database-specific privileges section, select the database you’ve just created for WordPress under the Add privileges to the following database dropdown, and click Go.
- # The page will refresh with privileges for that database. Click Check All to select all privileges, and click Go.
- # On the resulting page, make note of the host name listed after Server: at the top of the page. (This will usually be localhost.)


export settings
I've exported the database by the following commands: select database > export > custom > select all tables > select .zip compression > 'Go'
I've downloaded the file which is example.sql.zip but when I upload to my localhost I get this error: phpMyAdmin - Error > Incorrect format parameter
This issue is not because of corrupt database. I found the solution from this video – https://www.youtube.com/watch?v=MqOsp54EA3I
It is suggested to increase the values of two variables in php.ini file. Change following in php.ini
upload_max_filesize=64M
post_max_size=64M
Then restart the server.
This solved my issue. Hope solves yours too.
finding php.ini – user php info file – and look for:
| Configuration File (php.ini) Path | /usr/local/AppCentral/php7/etc |
|---|---|
| Loaded Configuration File | /usr/local/AppCentral/php7/etc/php.ini |
| Apache Version | Apache |
|---|---|
| Apache API Version | 20120211 |
| Server Administrator | you@example.com |
| Hostname:Port | www.spiffynasty.com:0 |
| User/Group | admin(999)/999 |
| Max Requests | Per Child: 0 – Keep Alive: on – Max Per Connection: 100 |
| Timeouts | Connection: 300 – Keep-Alive: 5 |
| Virtual Server | Yes |
| Server Root | /usr/local/AppCentral/httpd-2.4.43/data/conf — apache2.conf (looks like) |
/volume1/.@plugins/AppCentral/httpd-2.4.43/data/conf
Virtual Hosts on Apache
APACHE COMMANDS
Can you please check if Apache is running and also perform a restart as well? You can check if apache is running with this command:
systemctl status apache2
And also test it using netstat :
netstat -plunta | grep 80
If netstat is not installed you can install it using apt-get for Ubuntu:
sudo apt-get install net-tools
To restart Apache run:
sudo systemctl restart apache2
Everything looks good when I test it using curl or wget
domain.com!

Success! The domain.com virtual host is working!
The domain name is not loading via the browser. The DNS seems to be updated, but I’ve also tested this using a hosts file and the result was the same.
I will also double check the ownership and the permissions of the root dir for the domain and make sure that the virtual host file is enabled.
sudo a2ensite your_domain.conf
You can check the whole article here:
ADM CLI
ASUSTOR NAS – COMMAND LINE
Please note that our system is an embedded system called ADM. It is similar to Linux but it is not Linux but some of Linux command can be applied in our ADM.
<b
Below lists commands that applied to ADM.
addgroup
adduser
ash
base64
cat
catv
chatter
chgrp
chmod
chown
cp
cpio
cttyhack
date
dd
delgroup
deluser
df
dmesg
dnsdomainname
dumpkmap
echo
ed
egrep
false
fdflush
fgrep
fsync
getopt
grep
gunzip
gzip
hostname
hush
ionice
iostat
ip
ipcalc
kill
linux32
linux64
ln
login
ls
lsattr
lzop
makemime
mkdir
mknod
mktemp
more
mount
mountpoint
mplayer
mpstat
mt
mv
netstat
nice
pidof
ping
ping6
pipe_progress
powertop
printenv
ps
pwd
reformime
rev
rm
rmdir
rpm
run-parts
scriptreplay
sed
setarch
setserial
sh
sleep
stat
stty
su
sync
tar
touch
true
umount
uname
usleep
vi
watch
zcat
https://httpd.apache.org/docs/trunk/vhosts/examples.html
Mixed port-based and ip-based virtual hosts
The server machine has two IP addresses (172.20.30.40 and 172.20.30.50) which resolve to the names www.example.com and www.example.org respectively. In each case, we want to run hosts on ports 80 and 8080.
Listen 172.20.30.40:80
Listen 172.20.30.40:8080
Listen 172.20.30.50:80
Listen 172.20.30.50:8080

<VirtualHost 172.20.30.40:80>
    DocumentRoot "/www/example1-80"
    ServerName www.example.com
</VirtualHost>

<VirtualHost 172.20.30.40:8080>
    DocumentRoot "/www/example1-8080"
    ServerName www.example.com
</VirtualHost>

<VirtualHost 172.20.30.50:80>
    DocumentRoot "/www/example2-80"
    ServerName www.example.org
</VirtualHost>

<VirtualHost 172.20.30.50:8080>
    DocumentRoot "/www/example2-8080"
    ServerName www.example.org
</VirtualHost>

Mixed name-based and IP-based vhosts
Any address mentioned in the argument to a virtualhost that never appears in another virtual host is a strictly IP-based virtual host.
Listen 80
<VirtualHost 172.20.30.40>
    DocumentRoot "/www/example1"
    ServerName www.example.com
</VirtualHost>

<VirtualHost 172.20.30.40>
    DocumentRoot "/www/example2"
    ServerName www.example.org
</VirtualHost>

<VirtualHost 172.20.30.40>
    DocumentRoot "/www/example3"
    ServerName www.example.net
</VirtualHost>

# IP-based
<VirtualHost 172.20.30.50>
    DocumentRoot "/www/example4"
    ServerName www.example.edu
</VirtualHost>

<VirtualHost 172.20.30.60>
    DocumentRoot "/www/example5"
    ServerName www.example.gov
</VirtualHost>
WEB SHARE FOLDER ORIGINAL PERMISSIONS – DO I CHANGE THIS?

ERROR:::
/*!40101 SET CHARACTER_SET_CLIENT=@OLD_CHARACTER_SET_CLIENT */
MySQL said: Documentation
#1231 – Variable ‘character_set_client’ can’t be set to the value of ‘NULL’
I did some search in internet and fixed it finally.
Added the following text at the beginning of the mysqldump file and the restore was successful.
/*!40101 SET @OLD_CHARACTER_SET_CLIENT=@@CHARACTER_SET_CLIENT */;
/*!40101 SET @OLD_CHARACTER_SET_RESULTS=@@CHARACTER_SET_RESULTS */;
/*!40101 SET @OLD_COLLATION_CONNECTION=@@COLLATION_CONNECTION */;
/*!40101 SET NAMES utf8 */;
/*!40103 SET @OLD_TIME_ZONE=@@TIME_ZONE */;
/*!40103 SET TIME_ZONE=’+00:00′ */;
/*!40014 SET @OLD_UNIQUE_CHECKS=@@UNIQUE_CHECKS, UNIQUE_CHECKS=0 */;
/*!40014 SET @OLD_FOREIGN_KEY_CHECKS=@@FOREIGN_KEY_CHECKS, FOREIGN_KEY_CHECKS=0 */;
/*!40101 SET @OLD_SQL_MODE=@@SQL_MODE, SQL_MODE=’NO_A
https://www.asustor.com/en/online/College_topic?topic=110
COURSE OBJECTIVES
Upon completion of this course you should be able to:
\1. Create and manage users, groups, shared folders and privileges on an ASUSTOR NAS
\2. How to set up and use Access Control
PREREQUISITES
*Course Prerequisites:*
None
*Students are expected to have a working knowledge of:*
None
OUTLINE
1. Introducing Access Control
1.1 What is Access Control?
1.2 What are the differences between admin rights and user rights?
2. How to set up Access Control?
2.1 Local Users
2.2 Local Groups
2.3 AD /LDAP
2.4 Shared Folders
2.5 App Privileges
1. Introducing Access Control
1.1 What is Access Control?
Access Control manages shared folder and app permissions for multiple users and groups on an ASUSTOR NAS. ASUSTOR NAS devices offer permission settings in the event multiple people use a NAS and information needs to be separated, such as when confidential information is stored. Rights and permissions can be customised based on a user’s needs.
1.2 *What are the differences between admin rights and user rights?*
The admin account and admin rights are the default setting when purchasing an ASUSTOR NAS, while user group accounts can only access certain folders and apps as designated by an administrator.
About Local Users
After initialisation, ADM automatically creates an admin account as well as a guest account. The default admin account can either be left as is or renamed and comes with full rights within the NAS while the guest account has restrictions and only is able to use SAMBA and AFP. Guest account cannot log into ADM and password cannot be changed.

About Local Groups
After initialisation, two user groups are automatically created, named Administrators and Users. Administrators is the default group. If a user is added to this group, they will possess a majority of the administrator access rights. Admin belongs to the Administrators group by default and cannot be removed from it.

2. Setting up Access Control
2.1. Local Users
Add, edit and remove local users here. Rights can also be assigned, edited and removed.
2.1.1 Adding a user and assigning rights
\1. Add a new user by clicking Add.

2.Fill out user information
3.Select whether the user receives customized access rights or is an administrator. Selecting the first option will open options to assign rights.


\4. Assign shared folder access rights here.
DA: Deny Access
RW: Read & Write
RO: Read Only
Priority of access rights: Deny Access > Read & Write > Read Only > No settings
\5. Quotas can be set here. Btrfs volumes do not support quotas. 
\6. Assign app privileges as needed and user creation is now complete.


2.1.2. Editing user details and access rights
Highlight a user and click edit to edit user information.

**
**
Click Groups to modify a user’s group or assign a new one.

**
**
Click Folder Access Rights to modify rights.

DA: Deny Access
RW: Read & Write
RO: Read Only
Priority of access rights: Deny Access > Read & Write > Read Only > No settings

**
**
 *: User access rights for shared folders*
 *: Group access rights for shared folders*
Click quotas to modify quotas for the user.

*2.2. Local Groups*
Click Local Groups to add, modify and remove local groups.
Reminder: ASUSTOR recommends reserving groups for large numbers of users.
**
**
*2.2.1* *Adding local groups and assigning rights*
\1. Click Add to create a new local group.

**
**
\2. Fill in the group name, a description and select a Group ID.

**
**
\3. Select one or more users to join the new group.

**
**
\4. Assign folder access rights for the group and review settings.

DA: Deny Access
RW: Read & Write
RO: Read Only
Priority of access rights: Deny Access > Read & Write > Read Only > No settings


**
**
**
**
*2.2.2* *Editing group information and modifying rights.*
Edit group

Edit members

Edit Folder-Access Rights

DA: Deny Access (Deny Access for group to access folder)
RW: Read & Write (Group can Read & Write the folder)
RO: Read Only (Folder Read Only for the group)
Priority of access rights: Deny Access > Read & Write > Read Only > No settings
2.3 *AD/LDAP*
If you are using Windows Active Directory (hereafter referred to as "AD"), you can add your NAS to your AD domain.
Windows Active Directory: After successfully adding your NAS to an Active Directory domain, you can then configure access rights using domain users, domain groups and shared folders settings using the Access Control app. Active Directory users can then use their own Active Directory accounts to log in and access the NAS.
Lightweight Directory Access Protocol (LDAP): LDAP, also known as Lightweight Directory Access Protocol is mainly used for unified management of accounts and passwords. Using LDAP can more efficiently manage user authentication or computer resource permissions across the enterprise. Users can easily add an ASUSTOR NAS to their existing LDAP server, providing easier ways to help manage productivity.
*
*
Reminder: ASUSTOR NAS can support more than 200,000 AD users and groups. When joining an AD domain for the first time, depending on the number of users and groups, it may take a while for all of them to become visible.
**More
****NAS 206 – Using NAS with Windows Active Directory****
*
*
2.4. Shared Folders
Here you can manage your shared folders and set up their access rights in relation to users and user groups. Shared folders allow your NAS to become a file server. They are fundamental in sharing files with the outside world. Consequently, correctly setting up their access rights is very important in the management of your data.
After initialization, the system will automatically create a shared folder "public". By default, all users can access the files in this folder. Additionally, the system will automatically create a personal folder for each user (using the user's account name) that by default, can only be accessed by the mentioned user.
2.4.1 How to add shared folders and set up the access rights?
\1. Add

\2. Fill out the information

Note: Here are three optional options for user to choose.
- Invisible in "Network" or "My Network Places": This setting only applies if you are using Microsoft Windows. When you enable this setting, your NAS will cease to automatically appear in "Network" or in "My Network Places". Please note that enabling this setting will not affect the connection to your NAS in any way.
- Empty Recycle Bin: Click this button to empty all contents in this shared folder’s Recycle Bin immediately.
- · Encrypt this shared folder: Here you can choose whether or not you want to encrypt your shared folder and whether or not you want to auto-mount it at system startup. Should you choose to encrypt your folder, after the system restarts, you will have to manually enter the password or import the encryption key for the folder in order to access it. Encrypted folders are normally used for the storage of critical or confidential data. Should you lose your NAS you still needn’t worry about your data leaking out and falling into the wrong hands.
Warning:
When choosing to use encrypted shared folders, please make it a point to remember your password. Should you forget your password, the data in the shared folder will become unrecoverable.
\3. Set up folder access rights
“Read Only for all the users, Read & Write for administrators “is the default option.
Press Next to confirm the information.

Other two options: By user and By group
By user

Select user

DA: Deny Access (Deny Access for user to access the shared folder)
RW: Read & Write (User can Read & Write the shared folder)
RO: Read Only (Shared folder Read Only for the user)
Priority of access rights: Deny Access > Read & Write > Read Only > No settings
Finish

By group

Set up group access rights to the shared folderDA: Deny Access (Deny Access for group to access shared folder)

RW: Read & Write (Group can Read & Write the shared folder)
RO: Read Only (Shared folder Read Only for the group)
Priority of access rights: Deny Access > Read & Write > Read Only > No settings
Finish

Note:
About Windows ACL
\1. After enabling Windows ACL for a shared folder, the shared folder and all subfolders and files contained within it can be assigned user or group permissions.
\2. The following shared folders do not support Windows ACL permissions: Home, User Homes, PhotoGallery, Web, Surveillance, MyArchive, Network Recycle Bin, virtual devices, external devices (USB hard drives, optical drives).
\3. After enabling Windows ACL you will be able to use ADM’s File Explorer or Microsoft Windows Explorer to configure permissions. After disabling Windows ACL you will only be able to configure permissions from within ADM's File Explorer.
\4. If you enable Windows ACL and then later decide to disable it, all file and folders will be re-assigned with Read & Write permissions for all users.
\5. No matter if you are using Windows ACL or not, users will still require shared folder and file permissions in order to access files.
More
NAS 471 – Introduction to Windows ACL
2.4.2 How to edit shared folder and the access rights?
Select the shared folder and press edit

Edit

Adjust access rights
Select the shared folders and press Access Rights

Adjust Access rights (For convenience, the system provides a preview mode which allows you to first preview any changes that you make to access rights.)

DA: Deny Access (Deny access for the user to access folder)
RW: Read & Write (User can Read & Write the folder)
RO: Read Only (Folder Read Only for the user)
Priority of access rights: Deny Access > Read & Write > Read Only > No settings
: User access rights for shared folders
: Group access rights for shared folders
2.4.3 Virtual Drive
You can mount an ISO image file (.iso file) as a virtual drive and directly browse the content of the ISO image file. ADM’s virtual drive function also provides simplified access control settings allowing you to either configure access for all users or limit access to only administrators.
2.4.4 CIFS Folder
Here, you can mount remote folders as shared CIFS folders and configure their usage permissions according to users or user groups.
More
NAS 344 – How to create CIFS folders
2.5. App Privileges
Here you can configure the users' or user groups' access rights to apps. For example, if a particular user's account is denied access to the Surveillance Center app, once he/she logs in, he/she will not be able to see the Surveillance Center app icon on their ADM home screen. The user will have no way of opening or accessing the app.
Web applications may be public in nature (i.e., WordPress) or have their own account management systems (i.e., Joomla). Therefore, there is no way to restrict access to them through ADM.With regards to domain users, the system only offers the option of setting their File Explorer access rights.Note: Privilege settings are only for non-[administrators] group users.
2.5.1 How to edit App Privileges?Select the app and press Edit Select user
2.5.2 How to edit user access rights?Select user and press Edit
Select app