NAS
PHPMyAdmin – Update Manually
Introduction Guide updated and tested in June 2021. This guide has been tested from Ubuntu 20.10 to 16.04. It should also work for other Debian-based distributions without issue. For CentOS users, please refer to the comments section at the end of this page as commands will be different. I will try to update this guide for CentOS as soon as I get the chance to test it. In the meantime, if you have any suggestions on how to improve this guide, please let me know in the comments. 1. Back up phpMyAdmin You should back up your current phpMyAdmin folder by renaming it. sudo mv /usr/share/phpmyadmin/ /usr/share/phpmyadmin.bak Create a new phpMyAdmin folder sudo mkdir /usr/share/phpmyadmin/ Change to directory cd /usr/share/phpmyadmin/ 2. Download and Extract phpMyAdmin Update Feb 2020: phpMyAdmin 5 has been released but it is only compatible with PHP 7.1 and above. To find out your PHP version in command line, run
PHPMyAdmin – Update Manually More »
Port Forward | NO-IP Setup
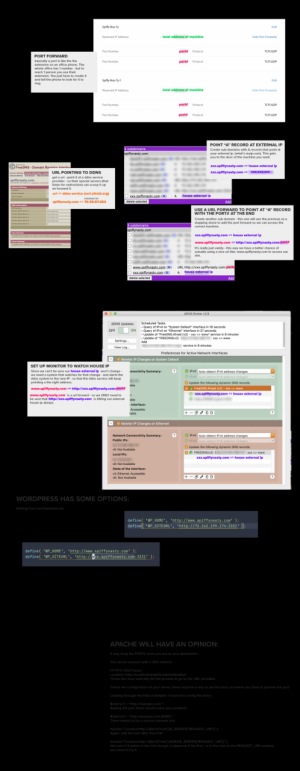
https://www.noip.com/support/knowledgebase/general-port-forwarding-guide/ How to Port Forward – General Guide to Multiple Router Brands Here’s a great video that explains the basics of port forwarding: https://www.youtube.com/watch?v=CLunOJZqmc0 If you have a router at home or your office, you will need to forward ports in order for outside traffic to get into your network. Think of your router as being a huge electric fence or wall, with a few doors or openings. This electric fence or wall serves as your barrier and security blanket from the scary outside Internet world. Your router comes preconfigured with a few of those doors (or ports) open to let you access the internet, but the others are closed tight. So, in order to run a mail server, game server, access your computer remotely, etc you will need to open an extra door or two in your router in order for the outside traffic to get inside. This is called Port Forwarding. Step
Port Forward | NO-IP Setup More »
Ports Used
https://www.asustor.com/en/knowledge/detail/?id=&group_id=601 Please refer to the table below for a list of network ports used by ASUSTOR NAS services. Utilities Port Protocol ASUSTOR Control Center 8888, 8889 UDP System Services Port Protocol ADM Web service 8000, 8001 TCP AFP 548 TCP Common Unix Printing System 631 TCP FTP service (Server) 21 TCP FTP service (Client) 55536 ~ 56559 TCP iSCSI service 3260 TCP MySQL service 3306 TCP NFS 2049 TCP/UDP Rsync service 873 TCP Samba 137, 138, 139, 445 TCP SSH service 22 TCP WebDAV 9800, 9802 TCP Web service 80, 443 TCP Apps Port Protocol aMule 4662, 4665, 4672, 4711, 4712 TCP/UDP ASUSTOR Portal 8807 TCP/UDP Bicbucstriim 80 TCP/UDP BitTorrent Sync 5555 TCP/UDP Boxee 8805, 5000, 54321 TCP/UDP Cloudfleet 20030, 20031, 20032 TCP/UDP CouchPotato 5050 TCP/UDP Deluge 8112, 58846 TCP/UDP Download Center 9999, 55555 TCP/UDP DVBLink TV Server 8100, 8101, 39876, 39877, 39878, 39879, 39880, 39881, 39882, 39883, 65432 TCP/UDP Domoticz 9980 TCP/UDP Emby

Remote Access – Manual Connect
https://www.asustor.com/en/online/College_topic?topic=224 Remote Access – Manual Connect Manually configuring your NAS's connection to the Internet Course Objectives: After completing this course you will be able to: Configure your network equipment to setup remote access to your NAS via the Internet. PREREQUISITES *Course Prerequisites:* NAS 221: Remote Access – Using EZ-Connect *Students are expected to have a working knowledge of:* Signing up for DDNS services and setting up routers OUTLINE 1. Remote Access 1.1 Accessing your ASUSTOR NAS using the Internet 1.2 Configuring your router 1.3 Configuring DDNS service 1.4 Activate EZ-Router 1.5 Additional notes 1. Remote Access *1.1 Accessing your ASUSTOR NAS using the Internet* ASUSTOR provides users with quick and convenient solutions that allow them to use their NAS through the internet and remotely access their files, creating an exclusive private cloud. You can use any of the following methods to set up remote access to your NAS. Directly
Remote Access – Manual Connect More »
Renew SSL when NAS is behind reverse proxy server
How to renew spiffynasty.com cert on NAS On Proxy Server run sudo certbot certonly – as spiffy-root – here on proxy server – certot should successfully reissue expired certs choose nginx plugin (option 2) – follow prompts you want to renew and replace existing for spiffynasty.com – here on the proxy server once renewed check path to files then copy the privkey.pem and fullchain.pem to /home/spiffy-root/spiffynastyssl/apr2025 – or whatver month you are in open the privkey.pem and fullchain.pem on proxy server copy the contents using macos copy so they are in clipboard ON NAS on NAS as user spiffy go to /volume1/home/spiffy/spiffynastyssl/apr2025 – whatever month year as admin user sudo touch / sudo nano privkey.pem and fullchain.pem – pasting what was copied off the proxy server into go into nas interface ADM > settings > Certificate Manager > ADD new certificate choose to REPLACE and existing – spiffynastycert import your SSL private key / cert
Renew SSL when NAS is behind reverse proxy server More »
Reverse Proxy & Internal and External Urls w/ WordPress
How the Reverse Proxy Handles HTTP to HTTPS When you set up a reverse proxy, here’s how it works: External HTTPS Request: A user visits https://spiffynasty.com/blahblahblah/ (secured with HTTPS). The reverse proxy (on spiffynasty.com) receives this request over HTTPS. Internal Forwarding to HTTP: The reverse proxy forwards this request internally to your NAS using HTTP, like http://192.168.1.30/blahblahblah/. The connection between spiffynasty.com and 192.168.1.30 (your NAS) is happening over your local network, so it’s secure in the sense that it’s not exposed to the outside world. Response from NAS: Your NAS (192.168.1.30) serves the requested content back to the reverse proxy over HTTP. Secure Response to the Client: The reverse proxy then encrypts the response (via HTTPS) and sends it back to the user as https://spiffynasty.com/blahblahblah/. Why It’s Safe: The critical point is that the public-facing side (what users interact with) is over HTTPS, secured by the certificate you set up on spiffynasty.com. The internal communication
Reverse Proxy & Internal and External Urls w/ WordPress More »
secure nas with https
https://www.asustor.com/online/College_topic?topic=324 Enter the following information:[Domain name]: Enter the domain name registered with the domain provider. For the use of myaustor.com, you can type your Cloud id and .myasustor.com together. For example, cloudid.myasustor.com.[E-mail]: Enter the e-mail address used to register for the certificate. Here you can use your NAS registration email if you want to use it with myasustor.com.[Subject Alterative Name]: If this certificate needs to be used on multiple domains, please enter the names of the other domains. (Not a necessary item.)[Update automatically when certificates expire.]: Let’s Encrypt issued certificates will expire after 90 days. By selecting this option, ADM will automatically renew the certificate before the expiration date, if domain verification is successful. Please ensure that your NAS and router have port 80 opened in order to allow for certificate updates.Click on [Finish]. The Let’s Encrypt certificate will be imported to ADM Note: If you use http, the webpage will not be trusted
Setting UP NextCloud
URL: http://www.spiffynasty:32680 | http://www.spiffynasty:32680/settings/apps USR: nas-cloud RESOURCES USER MANUAL: https://docs.nextcloud.com/server/20/user_manual/en/ ADMIN MANUAL: https://docs.nextcloud.com/server/20/admin_manual/ DEVELOPER MANUAL: https://docs.nextcloud.com/server/20/developer_manual/ EXAMPLES: https://www.asustor.com/en-gb/online/College_topic?topic=273 *COURSE OBJECTIVES* Upon completion of this course you should be able to: use NextCloud with OnlyOffice Beta for document editing and group collaboration. *OUTLINE* 1. Introduction 2. How to Install and use NextCloud and OnlyOffice for Document Editing and Group Collaboration 2.1. Installing NextCloud 2.2. Installing OnlyOffice and NextCloud Setup 2.3. Setting Up Group Collaboration **1. Introduction** ** Increase productivity with an ASUSTOR NAS and OnlyOffice. An ASUSTOR NAS with NextCloud and OnlyOffice becomes an extensive productivity suite designed to make editing files, including, but not limited to documents, spreadsheets and presentations even easier than ever. OnlyOffice, a groupware app, also enables multiple users to edit supported files simultaneously, allowing people to easily collaborate on projects. **2.How to Install and use NextCloud and OnlyOffice for Document Editing and Group Collaboration**** 2.1. . Installing NextCloud 1.Install NextCloud
SPIFFYNASTY.com
remote connect to nas
https://www.asustor.com/en/online/College_topic?topic=224 COURSE OBJECTIVES Upon completion of this course you should be able to: 1. Configure your network equipment to setup remote access to your NAS via the Internet. PREREQUISITES Course Prerequisites: NAS 221: Remote Access – Using EZ ConnectTM Students are expected to have a working knowledge of: Signing up for DDNS services and setting up routers OUTLINE 1. Remote Access 1.1 Accessing your ASUSTOR NAS using the Internet 1.2 Configuring your router 1.3 Configuring DDNS service 1.4 Additional notes Appendix List of Ports Used by ASUSTOR Applications 1. Remote Access 1.1 Accessing your ASUSTOR NAS using the Internet ASUSTOR provides users with quick and convenient solutions that allow them to use their NAS through the internet and remotely access their files, creating an exclusive private cloud. You can use any of the following methods to set up remote access to your NAS. a. Directly connecting your NAS to the internet If you have
SPIFFYNASTY.com
remote connect to nas More »
spiffynasty
apps
Cloud Connect http://www.myasustor.com/ http://spiffy-nas-ty-cloud.myasustor.com:8000 Developer Account https://developer.asustor.com/developerCenter Support Center https://support.asustor.com/index.php Note: Please setup DDNS for NAS with validate certificate and login ADM with DDNS hostname via HTTPS connection before install this App if you want to use HTTPS connection. MORE INFO ON APPS https://www.asustor.com/app_central/app_detail?id=1061&type= FileZilla is a cross-platform graphical FTP, SFTP, and FTPS file management tool with a vast list of features. This is a Docker container for FileZilla Client. The GUI of the application is accessed through a modern web browser (no installation or configuration needed on the client side) or via any VNC client. Note: 1. The “/storage” folder of FileZilla binds to shared folder root of NAS, please find files in that folder. 2. If you want to access FileZilla via VNC client, please use :25890 to connect. Squid Cache http://www.squid-cache.org/ https://www.asustor.com/app_central/app_detail?id=567&type=17&model= Description Squid is a caching proxy for the Web supporting HTTP, HTTPS, FTP, and more. It reduces bandwidth and improves

Update MariaDB + PhpMyAdmin PW
UserAccounts – root/localhost user – edit privileges Hit Change Password – Update Password Changes root for mariaDB and phpmyadmin – so relogin +++++++++++++++++++++++++++++ https://amigotechnotes.wordpress.com/2016/06/20/change-default-password-for-mysqlmariadb-and-phpmyadmin-on-nas/ Change Default Password for MySQL/MariaDB and phpMyAdmin on NAS 2016/06/20 Amigo How-To, InformationAsustor, MariaDB, MySQL, NAS, password, phpMyAdmin, QNAP, Synology I always need to look for the default password for MariaDB and phpMyAdmin in my NAS. There is no hint at all. Some even change the rules after upgrade. Therefore, I write a note here and share to save your time. This page would be continuously maintained. Asustor You don’t need to install MariaDB which is already build-in in ADM. Open Services → MariaDB S**erver, select “Enable MariaDB server”, and click “Apply”** to launch. If your application and MariaDB run on the same machine, there is no need to select “Enable MariaDB remote access”. More detail, please read Using NAS as your Database
Update MariaDB + PhpMyAdmin PW More »
VIM / vi filename – default ssh editor
Vim is the default editor that comes installed on the Asustor NAS. EDIT using $ vi filename https://www.openvim.com/ Save / Exit / Edit Vim > Vim is the text editor of choice for many users that spend a lot of time on the command line. Unlike other editors, Vim has several modes of operation, which can be a little intimidating for new users. Vim or its precursor Vi comes preinstalled on macOS and almost all Linux distributions. Knowing the basics of Vim will help you when you encounter a situation where your favorite editor is not available. This guide explains how to save a file in Vim / Vi and quit the editor. Vim Modes When you launch the Vim editor, you’re in normal mode. In this mode, you can use vim commands and navigate through the file. To type a text, you need to enter the insert mode by pressing the i key. This
VIM / vi filename – default ssh editor More »
XFinity – Port Forwarding – No Reserved Address – Need App to turn off Adv. Security
Appp for security settings https://www.portchecktool.com/ Port 25 is blocked – which I guess isn’t a good sign XFI ADVANCED SECURITY What is xFi Advanced Security? xFi Advanced Security gives added peace of mind for your home network by preventing you from inadvertently visiting malicious sites or downloading dangerous files, as well as blocking remote access to smart devices from known dangerous sources. Advanced Security monitors devices real-time and will alert you when devices are behaving in unusual ways that could indicate a network threat. It will also adapt to your home network and get smarter over time to keep up with new threats. How do I access Advanced Security features in xFi? Advanced Security is available to Xfinity Internet subscribers who rent one of the following compatible xFi Gateways (Arris TG1682G, Cisco DPC3941T, Arris TG3482G, Technicolor CGM4140COM, Technicolor CGM4331COM, Commscope TG4482A or Arris X5001). If you haven’t already, download the Xfinity app or visit the
XFinity – Port Forwarding – No Reserved Address – Need App to turn off Adv. Security More »