Asustor User Guide
b149785958d73f2601c34a07284e29627698
Using NAS with Apple macOS A course about accessing your NAS using macOS and executing backup jobs using Time Machine. https://www.asustor.com/en-gb/online/College_topic?topic=108 COURSE OBJECTIVES Upon completion of this course you should be able to: Access the files on your NAS using macOS. Use Apple’s Time Machine to backup your NAS. PREREQUISITES *Course Prerequisites:* None *Students are expected to have a working knowledge of:* Apple macOS OUTLINE 1. Configuring your NAS 1.1 Setting up a backup folder 1.2 Creating an account 1.3 Enabling SMB/AFP service 2. Setting Up Backups on macOS 2.1 Connecting your Apple computer to your NAS 2.2 Using Time Machine to back up a Mac to an ASUSTOR NAS 1. Configuring your NAS 1.1 Setting up a backup folder Select [Access Control] → [Shared Folders] and click on the [Add] button under the Shared Folders tab to create a new shared folder (in our example, “TMBackup”). Follow the steps provided by the wizard to
App_Central_Developer_Guide_4.0.0_20210517.pdf
asustor – developer guide PDF More »
How the Reverse Proxy Handles HTTP to HTTPS When you set up a reverse proxy, here’s how it works: External HTTPS Request: A user visits https://spiffynasty.com/blahblahblah/ (secured with HTTPS). The reverse proxy (on spiffynasty.com) receives this request over HTTPS. Internal Forwarding to HTTP: The reverse proxy forwards this request internally to your NAS using HTTP, like http://192.168.1.30/blahblahblah/. The connection between spiffynasty.com and 192.168.1.30 (your NAS) is happening over your local network, so it’s secure in the sense that it’s not exposed to the outside world. Response from NAS: Your NAS (192.168.1.30) serves the requested content back to the reverse proxy over HTTP. Secure Response to the Client: The reverse proxy then encrypts the response (via HTTPS) and sends it back to the user as https://spiffynasty.com/blahblahblah/. Why It’s Safe: The critical point is that the public-facing side (what users interact with) is over HTTPS, secured by the certificate you set up on spiffynasty.com. The internal communication
Reverse Proxy & Internal and External Urls w/ Wordpress More »
Aapache2 /usr/local/AppCentral/httpd-2.4.43/data/conf docker /volume1/Docker (possible dupe of older article) https://amigotechnotes.wordpress.com/2014/02/21/asustor-adm-configuration-and-executable-files/ One of my problems on Asustor ADM is to find files. Therefore, I will maintain and update this list regularly. Configurations httpd-ssl.conf /volume0/usr/builtin/etc.default/apache2/extra/httpd-ssl.conf apache2.conf /volume0/usr/builtin/etc/apache2/apache2.conf nginx.conf /volume0/usr/builtin/etc/nginx/nginx.conf apc.ini /volume0/usr/builtin/etc/php5/conf.d/apc.ini iptables.conf iptables.allow iptables.deny /volume0/usr/builtin/etc/iptables/iptables.conf /volume0/usr/builtin/etc/iptables/iptables.allow /volume0/usr/builtin/etc/iptables/iptables.deny my.cnf /volume0/usr/builtin/etc/mysql/my.cnf php.ini Configuration File (php.ini) Path /usr/local/AppCentral/php7/etc Loaded Configuration File /usr/local/AppCentral/php7/etc/php.ini smb.conf /volume0/usr/builtin/etc/samba/smb.conf Executable apache /volume0/usr/builtin/etc/init.d/S54apache2 /volume0/usr/builtin/sbin/apache2 ipkg /opt/bin/ipkg Use with root Usage: ipkg install [package name] ipkg remove [package name] iptables /volume0/usr/builtin/sbin/iptables memecached /volume0/usr/builtin/bin/memcached mysql /volume0/usr/builtin/etc/init.d/S55mysql /volume0/usr/builtin/sbin/mysqld mysql shell /volume0/usr/builtin/bin/mysql php cli /volume0/usr/builtin/bin/php Log Files apache error /volume0/usr/builtin/var/log/apache2/error_log Other Files apache modules /volume0/usr/builtin/etc/apache2/mods-available/ /volume0/usr/builtin/etc/apache2/mods-enabled/ boot auto execute scripts /volume0/usr/builtin/etc/init.d/ /volume0/usr/builtin/etc/script/ php modules /volume0/usr/builtin/lib/php/20090626/ /volume1/.@plugins/AppCentral/php/lib/php/20121212/ (PHP 5.5.3 R2) /usr/local/AppCentral/php/lib/php/20121212/ (PHP 5.5.3 R2) session files /tmp web pages /volume1/Web/ Owner: admin Notes When use ssh to login, use ssh root@[IP] or some files won’t be executable or editable. The web admin must be login with port 8000
Asustor NAS – file locations More »
Keep having connection issues – it works – then without an changes from me – it’s down. NOTES: When you are bridged, the virtual machine asks the router directly for an IP address and can have ports forwarded to it. (Don’t forward 8123 to it, if you have port 443 working). When you set the mode to NAT, it doesn’t ask the router for an IP address Virtualbox gives it an IP address inside the Virtualbox ONLY network, in this mode you would need to port forward to the PC running virtualbox, rather than to the virtual machine itself – though I am not entirely sure how this configuration works myself to be honest, because then you are dealing with double NAT which makes everything a headache to troubleshoot. I believe when you are using the NAT mode, that you need to access Home Assistant via it’s NAT IP which you probably can’t do –
HomeAssistant | put some ass in your home. More »
nslookup 73.162.199.174 Server: 75.75.75.75 Address: 75.75.75.75#53 Non-authoritative answer: 174.199.162.73.in-addr.arpa name = c-73-162-199-174.hsd1.ca.comcast.net. Authoritative answers can be found from: 24:4b:fe:83:46:6b IPv4 Address 10.0.0.143 IPv6 Address 2601:645:8400:2eb0:264b:feff:fe83:466b Local Link IPv6 Address fe80::264b:feff:fe83:466b MAC Address 24:4B:FE:83:46:6B Comments lan1 – spiffynasty – 10.0.0.143 DHCP NA Ethernet spiffberrypiether IPv4 Address 10.0.0.205 MAC Address DC:A6:32:D6:C4:F7 Comments spiffberrypiethe 38:c9:86:28:2d:27 IPv4 Address 10.0.0.231 IPv6 Address 2601:645:8400:2eb0::801c Local Link IPv6 Address fe80::1c6f:7df9:351a:795a MAC Address 38:C9:86:28:2D:27 Comments imac ethernet spiffys-MBP IPv4 Address 10.0.0.203 IPv6 Address 2601:645:8400:2eb0::654d Local Link IPv6 Address fe80::147f:c634:e209:b5dd MAC Address B8:F6:B1:13:00:C1 Comments 10.0.0.203 – MacBook – Wifi spiffberrypi IPv4 Address 10.0.0.133 MAC Address 1C:BF:CE:55:E6:0B Comments 10.0.0.133 – wlan1 – wifi – berrypi AS5202T-466B IPv4 Address 10.0.0.144 IPv6 Address 2601:645:8400:2eb0:264b:feff:fe83:466c Local Link IPv6 Address fe80::264b:feff:fe83:466c MAC Address 24:4B:FE:83:46:6C Comments 10.0.0.144 nasty – ethernet From xfi – AS5202T-466B Hostname Brand 24:4B:FE:83:46:6C ASUS Model Operating System Asus Device Unidentified Device Type Generic Connection Type Ethernet Connection Point Wireless Gateway MAC Address 244BFE83466C IP Address 10.0.0.144
Introduction Guide updated and tested in June 2021. This guide has been tested from Ubuntu 20.10 to 16.04. It should also work for other Debian-based distributions without issue. For CentOS users, please refer to the comments section at the end of this page as commands will be different. I will try to update this guide for CentOS as soon as I get the chance to test it. In the meantime, if you have any suggestions on how to improve this guide, please let me know in the comments. 1. Back up phpMyAdmin You should back up your current phpMyAdmin folder by renaming it. sudo mv /usr/share/phpmyadmin/ /usr/share/phpmyadmin.bak Create a new phpMyAdmin folder sudo mkdir /usr/share/phpmyadmin/ Change to directory cd /usr/share/phpmyadmin/ 2. Download and Extract phpMyAdmin Update Feb 2020: phpMyAdmin 5 has been released but it is only compatible with PHP 7.1 and above. To find out your PHP version in command line, run
PHPMyAdmin – Update Manually More »
Vim is the default editor that comes installed on the Asustor NAS. EDIT using $ vi filename https://www.openvim.com/ Save / Exit / Edit Vim > Vim is the text editor of choice for many users that spend a lot of time on the command line. Unlike other editors, Vim has several modes of operation, which can be a little intimidating for new users. Vim or its precursor Vi comes preinstalled on macOS and almost all Linux distributions. Knowing the basics of Vim will help you when you encounter a situation where your favorite editor is not available. This guide explains how to save a file in Vim / Vi and quit the editor. Vim Modes When you launch the Vim editor, you’re in normal mode. In this mode, you can use vim commands and navigate through the file. To type a text, you need to enter the insert mode by pressing the i key. This
VIM / vi filename – default ssh editor More »
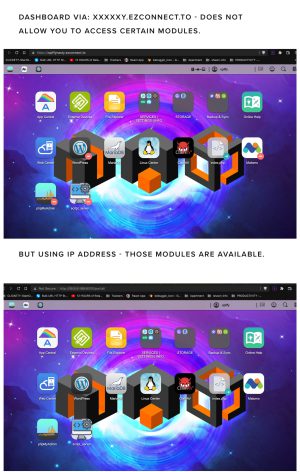
http://i.p.a.d.d.r.e.s.s/name-of-module/ http://i.p.a.d.d.r.e.s.s/phpmyadmin/ Use IP address – and the module name to access via browser.
Accessing Modules via Browser More »
https://www.asustor.com/en/online/College_topic?topic=224 Remote Access – Manual Connect Manually configuring your NAS's connection to the Internet Course Objectives: After completing this course you will be able to: Configure your network equipment to setup remote access to your NAS via the Internet. PREREQUISITES *Course Prerequisites:* NAS 221: Remote Access – Using EZ-Connect *Students are expected to have a working knowledge of:* Signing up for DDNS services and setting up routers OUTLINE 1. Remote Access 1.1 Accessing your ASUSTOR NAS using the Internet 1.2 Configuring your router 1.3 Configuring DDNS service 1.4 Activate EZ-Router 1.5 Additional notes 1. Remote Access *1.1 Accessing your ASUSTOR NAS using the Internet* ASUSTOR provides users with quick and convenient solutions that allow them to use their NAS through the internet and remotely access their files, creating an exclusive private cloud. You can use any of the following methods to set up remote access to your NAS. Directly
Remote Access – Manual Connect More »
Introduction to Access Control https://www.asustor.com/en/online/College_topic?topic=110 COURSE OBJECTIVES Upon completion of this course you should be able to: \1. Create and manage users, groups, shared folders and privileges on an ASUSTOR NAS \2. How to set up and use Access Control PREREQUISITES *Course Prerequisites:* None *Students are expected to have a working knowledge of:* None OUTLINE 1. Introducing Access Control 1.1 What is Access Control? 1.2 What are the differences between admin rights and user rights? 2. How to set up Access Control? 2.1 Local Users 2.2 Local Groups 2.3 AD /LDAP 2.4 Shared Folders 2.5 App Privileges 1. Introducing Access Control 1.1 What is Access Control? Access Control manages shared folder and app permissions for multiple users and groups on an ASUSTOR NAS. ASUSTOR NAS devices offer permission settings in the event multiple people use a NAS and information needs to be separated, such as when confidential information is stored. Rights and permissions
Mailserver Config – Asustor Nas https://www.asustor.com/online/College_topic?topic=269 COURSE OBJECTIVES Upon completion of this course you should be able to: 1.Send and receive mail using Mail Server on your ASUSTOR NAS PREREQUISITES Course Prerequisites: None Students are expected to have a working knowledge of: Mail servers and domain names OUTLINE 1.Introduction to Mail Server 2.Configuring Your NAS 2.1Signing up for an email domain name 2.2Enabling DDNS service 2.3Installing Mail Server 2.4Configuring port forwarding for Mail Server 3.Configuring Mail Server 3.1Enabling and configuring SMTP 3.1.1Adding multiple SMTP domain names 3.1.2Sending email via a third party SMTP relay server 3.2Enabling and configuring IMAP/POP3 3.3Security 3.3.1Spam filter 3.3.2Configuring the black and white list for Mail Server 3.3.3Antivirus 3.4Configuring Mail Server aliases 3.5Queue 3.6Mail Log 3.7Backing up your email 3.8Configuring personalized settings in Mail Server 4.Using Thunderbird to Send and Receive Mail 1.Introduction to Mail Server Installing ASUSTOR’s Mail Server can allow your ASUSTOR NAS to become Mail Server that supports
UserAccounts – root/localhost user – edit privileges Hit Change Password – Update Password Changes root for mariaDB and phpmyadmin – so relogin +++++++++++++++++++++++++++++ https://amigotechnotes.wordpress.com/2016/06/20/change-default-password-for-mysqlmariadb-and-phpmyadmin-on-nas/ Change Default Password for MySQL/MariaDB and phpMyAdmin on NAS 2016/06/20 Amigo How-To, InformationAsustor, MariaDB, MySQL, NAS, password, phpMyAdmin, QNAP, Synology I always need to look for the default password for MariaDB and phpMyAdmin in my NAS. There is no hint at all. Some even change the rules after upgrade. Therefore, I write a note here and share to save your time. This page would be continuously maintained. Asustor You don’t need to install MariaDB which is already build-in in ADM. Open Services → MariaDB S**erver, select “Enable MariaDB server”, and click “Apply”** to launch. If your application and MariaDB run on the same machine, there is no need to select “Enable MariaDB remote access”. More detail, please read Using NAS as your Database
Update MariaDB + PhpMyAdmin PW More »
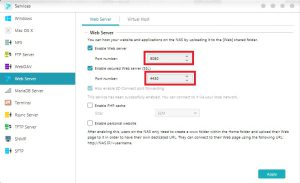
https://www.asustor.com/en/knowledge/detail/?id=&group_id=1004 Change Ports to get some services to work – ####Q: Why some of the services still not work even EZ Router/Port forward enabled? 2019-02-19 #EZ Router Some of the router will use specific service ports by default(for example webserver/80,443 FTP/21 ssh/22). In this case, even the compatible router's UPnP was enabled and ADM-Settings-Manual Connect-EZ Router was activated, the services/app(such as FTP, terminal, Photo Gallery and phpMyAdmin) still not able to be used from outside of the network. The issue could be solved by changing the service port in ADM-Service like WebServer from 80 to 8080 and 443 to 4430, FTP from 21 to 2100, then you should be able to access these services from out side of the network. *Currently we find ASUS compatible router model do have this issue, please try mentioned method to change NAS's service port to clarify if its caused by router.
Change Ports to enable services (80/443) More »
https://www.asustor.com/online/College_topic?topic=324 Enter the following information:[Domain name]: Enter the domain name registered with the domain provider. For the use of myaustor.com, you can type your Cloud id and .myasustor.com together. For example, cloudid.myasustor.com.[E-mail]: Enter the e-mail address used to register for the certificate. Here you can use your NAS registration email if you want to use it with myasustor.com.[Subject Alterative Name]: If this certificate needs to be used on multiple domains, please enter the names of the other domains. (Not a necessary item.)[Update automatically when certificates expire.]: Let’s Encrypt issued certificates will expire after 90 days. By selecting this option, ADM will automatically renew the certificate before the expiration date, if domain verification is successful. Please ensure that your NAS and router have port 80 opened in order to allow for certificate updates.Click on [Finish]. The Let’s Encrypt certificate will be imported to ADM Note: If you use http, the webpage will not be trusted
Seeing what I can do!Bluehost Name ServersTo host your website and/or manage your domain at Bluehost, you need to use our name servers (or you can also use the name server’s IP address.): Bluehost Nameservers ns1.bluehost.com 162.88.60.37 ns2.bluehost.com 162.88.61.37
So say hello mr. poster – let us know how it is going!! That’s some stuff to look at – and see if it actually comes through!!
check forward – see what happens More »
https://www.windowscentral.com/asustor-adm-4 ASUSTOR ADM 4.0: New features, how to install, and which NAS are supported ASUSTOR just turned its ADM NAS OS up to 11. Rich Edmonds 23 Jun 2021 Source: Windows Central ASUSTOR is developing quite the update for its network-attached storage (NAS) enclosure operating system. ASUSTOR Data Master (ADM) is the Windows OS for ASUSTOR's best NAS for home enclosures, allowing owners to install apps and services, set up and manage accounts, as well as configure the NAS and perform regular tasks. The big update in question is ADM 4.0, which is quite the overhaul. The beta launched in June 2021, and we've had a chance to play around with the update to see what's new. Here's everything you need to know about ADM 4.0. ASUSTOR ADM 4.0: What's new Release date Supported NAS How to install ASUSTOR ADM 4.0: New features Source: Windows Central There are numerous new features in ADM
NAS – Upgrade to ADM 4.0 More »
https://www.asustor.com/service/downloads?product_name=AS5202T will probably upgrade to ADM 4.0 Support Tech Support Ticket Compatibility Downloads FAQ Warranty Information Contact Us Tools NAS Selector NVR Selector RAID Calculator Getting Started myasustor.com ezconnect.to ASUSTOR Online ASUSTOR Developer Corner Community ASUSTOR College Other Service Accessories Store Marketing Materials